Saturday, April 14, 2018

Miscellaneous Fun Things to Share!

After a long, tough month I decided I needed some kind of creative break.  Up pops a FB post about a Fairy Garden class at a garden center that is quite a ways from my house.  As luck would have it, my car was in the shop just a few miles away from the garden center and I had to pick it up that morning - so perfect!!!  I had a blast making this fun Fairy Garden.  Of course I had to add to the standard package they give you for the class.  Fairies and bunnies and gnomes make me smile 😍 I do not have a green thumb so we'll see how long I can keep these succulents alive LOL

Love the cute little bunny, and smiling imp!

The beach is my happy place so I had to add a little water/sand feature!

I am a bit of a Lego fan.  Oh, who am I kidding, I am a HUGE Lego fan! This kit was one of my Valentines gifts from my wonderful husband.  I had to display it at work for International Women's Day this year.  The Women of NASA.  Amazing women who were crucial to our space program, at a time when it was unheard of for women to hold jobs in technical fields.  

These are Lego Sculptures that I saw at the Morton Arboretum in Lisle in 2015. It's hard to tell from the pics, but there were larger than life size creations all made from Legos!  I loved this special event, it was amazing!


And these are just a few of my Lego creations.  The Disney Castle is my FAVORITE!  It took me almost a year to get up the courage to start this one - it is 4,080 pcs!!!! 


Beatles Yellow Submarine - how cute is this!

Chicago - Lego Architecture series


And the amazing castle 💗


and the inside of the castle, each room has it's own decorations.


Wednesday, January 13, 2016

Wanderlust 2016 - Travel book

I'm taking a year long online class from "Everything Art" - the class is titled Wanderlust 2016. They have a different guest artist each week with different topics.  The first week was kind of free form and I really hated my project when I completed it, I was just in a funk. We also had lessons in paintbrushes which was very informative! This week we had a demo from Kate Crane called "Oh, The Places You'll Go" and it was right up my alley - a small handmade travel book!  

I titled mine with two sayings that (my family will tell you) accompany any car travel I make - Taking the Scenic Route (which means I am helplessly lost!) and Recalculating!
When my granddaughter was about four, I was driving her and took a route other than what my GPS was suggesting (for a change I wasn't lost!).  When the GPS said "recalculating" she piped up from the back seat "oh no! reCACulating?!?!?!?"  Even at her young age she knew recalculating was not a good thing HAHA!
The text on the covers was done with embossing paste, hard to tell from the pics....  the pages are 5 1/2 x 5 1/2, obviously the cover is a bit larger at 7 wide (because of the scalloped edge) by 6 1/2.  


Above pic on the left is the "back" of the album, the pages are decorated both sides.  The pic on the right is from the front side of two of the pages.  Between last week and this they covered various mixed media techniques so I tried to work some into the album.  A lot of the doodles were from a doodle book we also worked on this week, to get inspiration for our albums.


Left side is one of the doodles the instructor did in her book, I really liked the idea so I used it. I also made this page into a pocket page for tags and other souvenirs from my travels.  The pages on the right show some other doodles, some zentangle (black and white part on lower right page), and some stencils. I have a close up of the stamp on the top left of the far right page - it is a "wanderlust" definition stamp I had (Tim Holtz) and it really fit the album!


I started with some stencils on the top page (I think these are from Stencil Girl), added some ink and stamps.  On the right there are other doodles and stamps - mostly Tim Holtz, and some Close To My Heart.  


This is the view from the top, so you could see how it folds out. 


And then folded out from the front.  The far right pages are inserts sewn into the book. 


A close up of the Tim Holtz stamp I used, thought it very fitting for the book.  


I think I will enjoy this class, so far so good!! 


Saturday, August 15, 2015

Blackilght Run Album

Back in June I spent a weekend with my sister at the Scrapbook Expo in Akron - we attended workshop after workshop, went to a make-n-take evening event, and of course did a little shopping!  It was so much fun, and we made lots of fun things.  One of them was this cool album, flips up and open, has pockets and tags, in bright fun colors!  I wasn't sure what I would use it for, but then I got the pictures back from the Blacklight Run I took my granddaughter, her friend, and my grandson to last weekend. BINGO! Ready made album! I knew I had to scrap the pics for Hailey, this event was her 14th birthday present, she wanted to go SO badly.... pleeeeaaaasssse Grama, please could you take us?  Since she is also my bff, of course we were there! 


Here is the cover, all tied up - pic was as we left the house, all clean and dolled up in our blacklight apparel


Just a little better shot of the picture on the cover - love these kids!!!!


Flip the book open and the pages have pockets, with extra large tags - the colors in this book were perfect for this event, just added a little black cardstock!


Backside of one of the tags - left the back of the other one blank so she could write some of her memories of the evening.
  

This is the book all opened up - the far left and far right are 12x12 pages that fold up under the top pages shown above. The middle picture page flips up and down to show more pics.


The left pic is the middle of the album, this pic flips down, with more pics underneath. The right hand picture flips open to the 12x12 page, shown further down.


This is the inside when you flip the center page down


and this is the middle section all opened up - lots of room for pics!!


This is the left hand 12x12 page - this was the perfect size for this album, and so fun for a 14 year old to play with!  She loves scrapping and crafting so I'm guessing she will want to make one of these herself...


This is the right hand 12x12 page.

The kids had such a fun time at the Blacklight Run - I think this will be a fun reminder for my Hailey.....


Friday, July 3, 2015

My Super cool
Jacob's Ladder Box!!!!

This is the front, don't mind the mess back there please!  I couldn't wait to post these, I've been working on it almost all afternoon and evening.  I used some handmade papers I had - lesson learned, next box I'll make with different paper, this was so flexible it wanted to stretch and it was a little hard to line up.  But I love the look, worth the extra trouble. I learned this from "All Things Paper: 20 Unique Projects from Leading Paper Crafters, Artists, and Designers" by Ann Martin.  


 This is the back, I had a spool under here from photographing the inside, so that's why it looks crooked.  The pics don't quite do the papers justice, they have the same metallic copper veining, and this blue is actually a deep green blue turquoise.  My fav colors!!


Inside, with two smaller compartments.  One of the most difficult parts was lining these small areas.  


And if you flip open the lid the other way, wha-la! A larger compartment!!  This was fun fun fun!!! I am so sticky from glue, I'm surprised I'm not stuck to the keyboard.....


Friday, April 10, 2015

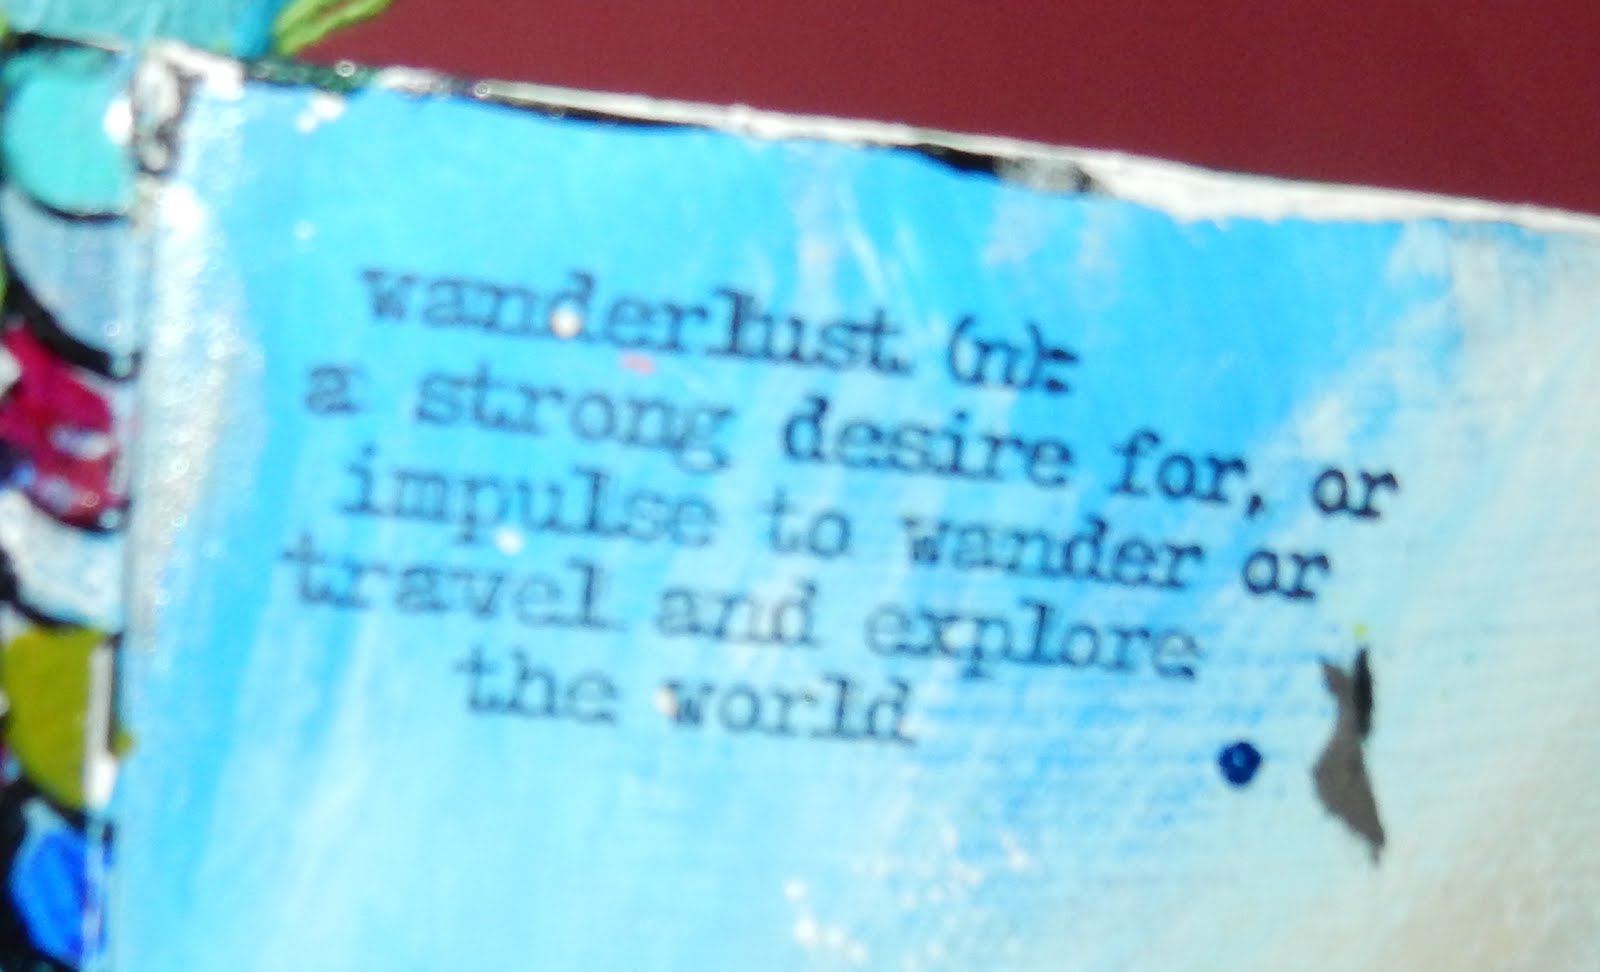
Close up of the top, bottom right corner.  Used Golden Glass Bead Gel over Distress Inks, stamping, and a little Distress Paint.  Used the glass bead gel with my FAVORITE Tim Holtz stencil and various "guy bling". You can see the original inlaid label in the middle of the box top.


Had fun last weekend altering a nice wooden cigar box.  We visited Ybor City, Florida recently. John bought a few handmade cuban style cigars, and I picked up some quality, really interesting cigar boxes.  

  I didn't take before pictures but you can see some of the original wood around the gold text on the top and front of the box.  The original catch is on the front.

I used mainly Tim Holtz/Ranger products - I think a few of the embellishments are Paper Studio. Distress Ink, Stickles, paper tape, Ranger Perfect Pearls, Golden Glass Bead Gel, Close To My Heart embellishments, and some handmade paper that I've had for years (it reminded me of cigar paper)

I love it, but more important John loves it!  His usual response when I show him something I made....  "It's darling" he says.  So when I get a "Wow!!! That's cool!!! Thank you!!!", then I know it's perfect. :-)    

So please enjoy my pics!


Right side of the box.  Used the label (on left)  from the cigar John smoked at the cigar bar in Ybor City.  That was a most wonderful day.  Tim Holtz die over the handmade paper, with some Distress Stickles.


It was hard to get a good pic of the front, Either way too dark, or had a nasty glare from the light. The is a mix of Perfect Pearls dimensional paint ands tickles as a frame around the edge.  Stain under the random stickles spead thin.


Front of the box, the latch on top was on the box. 

Left side of the box.  Motorcycle stamped on acetate over an old book page. Tim Holtz paper tape, handmade paper, the triangular studs and the frame around the motorcycle are Close To My Heart.  I tried to leave at least some of the tongue and groove construction visible on each side.


I left the inside of the box alone, the cigars need the wood, I didn't want to cover or seal it at all. I did add a Tim Holtz word band inside the lid, closeup below.  John retired last year, and he has earned this time, so this was perfect!


Close up of the front left of the box.  It's a mish-mash of old book paper, paper tape, metal, perfect pearls dimensional paint (around/under the edge of the clockface), stain, and the tongue and groove design of the box. 
This was SO  much fun to play with!

Sunday, March 29, 2015

"Tag Therapy" and other miscellaneous creative endeavors!

This is the grand results of my last few weekends of  
"tag therapy" 
I love the results!

This is from a past weekend - playing with stamps and tissue and canvas....

Some random stamps in progress....  practicing from my Copic certification class!!

 Love my fairy stamp!!


Butterflies, this one is really rather textural, but it doesn't come across in the photo - used a rough white embossing powder, and a shiny metallic on the blue

 
Dragonfly, with a stenciled and inked glass bead gel on the grid....


Another favorite stamp!!


To honor my love of reading and books of all sorts...

Mini tags!

 
 This one was modeled after a pinterest "sepia" copic post...

I love seeing the world differently, don't you?